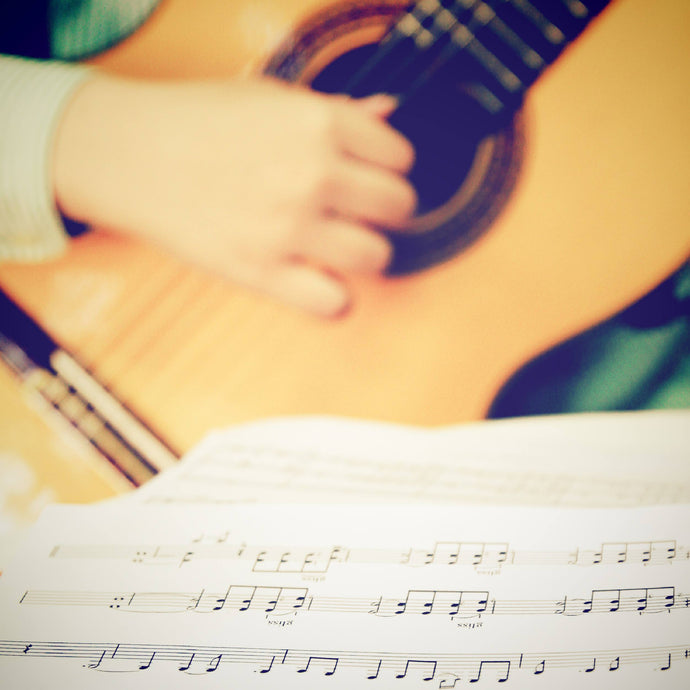
Chord charts make guitar players' lives easier. But if you're a beginner, they might seem confusing at first. In case you're just starting on the guitar, we'll help you out by explaining how to read chord charts and what they are.
What Is a Chord Chart?
Chord charts are a simplified form of musical notation. But compared to regular notation, it's a visual representation of the fretboard and recommended fingerings. It tells you how to place your fingers on the fretboard for an individual chord.
For an individual chord, you'll have a chord diagram. But a chord chart for a specific song will feature multiple chord diagrams. Sometimes, these charts can also include rhythmic notation, as well as strumming patterns. So when you read guitar chord diagrams, you can play an entire song.
Although mostly associated with the guitar, there are other instruments that can also use chord charts. But we'll focus on the guitar here. It's also important to know that "chord charts" and "chord diagrams" are most often interchangeable terms.
Essential Elements of Chord Charts
Horizontal and Vertical Lines
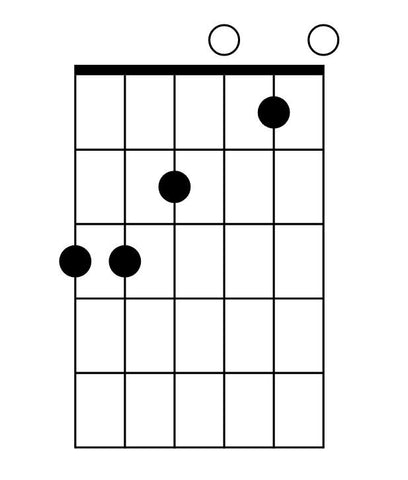
Each individual chord diagram has a basic construction. It consists of horizontal and vertical lines. Although this might seem confusing, these are really easy to figure out.
Horizontal lines present guitar frets. The nut, or the "zero fret," is usually marked with a thicker line and is at the very top. As you go down, you technically go up the fretboard and the fret number raises.
Vertical lines, on the other hand, present guitar strings. On the left side, we have the bottom E string or the 6th string. And on the right side, we have the high E or the 1st string.
Of course, things can be different if we're talking about different tunings. But in almost all cases, chord diagrams are written for the standard E tuning. If there's something different, it will be noted on the guitar chord diagrams.
Dots & Finger Numbering
Up next, you'll notice dots with numbers in them spread across individual chord diagrams. Essentially, these dots show you where to place the fingers on the fretboard. Additionally, the numbers present individual fingers of your fretting hand. Here's the list:
- 1 – Index finger
- 2 – Middle finger
- 3 – Ring finger
- 4 – Pinky
- T – Thumb
As you can see, there's also the "T" that presents the thumb. However, it's rarely ever used. As a beginner, you'll need to know about four fingers and how to navigate on the chord chart.
Fret Numbering
Fret numbering is also present in chord diagrams. Of course, it's not present on them all the time, unless we're talking about strictly beginner-oriented charts. To make things simpler, you'll just need the nut or the "zero fret."
But if a chord starts at a higher fret, you'll notice a number on the left side of the diagram, at the lowest fret, which is at the top of the diagram. For instance, if you're playing the A major chord in the 5th position, you'll have it looking like this:

Barre
Now, we talked about dots with numbers in them. These dots mark where your fingers should go and the numbers in them tell you which fingers to use. But looking at the pic posted above, what does this elongated bar mean?
Well, this is actually a "bar" or "barre" chord. This means that you'll use your index finger on all of the strings. Here's an example with the G minor chord where the index finger covers all of the strings on the third fret.

You can also have a barre chord covering only some of the strings, at least two. Here's an example with a G major chord in the third position:

Understanding Guitar Chord Symbols
You'll also notice that there's a bunch of other symbols on these diagrams. Some basic symbols include:
- O – Marks an open string that you should leave ringing out. It's located on the top of a chord diagram, right above the "zero fret."
- X – Marks a string that you're not playing. Some chord diagrams don't include it. But it's always better to have them as playing an open string can sometimes completely change the chord.
Of course, there are many other symbols, which we'll cover below.
Chord Chart Abbreviations and Symbols
When reading chord charts, you can notice chord names above them. However, in order to make things simpler, chord names are abbreviated or shortened with specific symbols. These are:
|
Just a chord letter |
Refers to a regular major chord |
|
Maj |
Major chord (ex. E Maj) |
|
min or "m" or "-" |
Minor chord, usually with a lowercase "m" |
|
7 or Dom7 |
Dominant chord |
|
Maj 7 |
Major 7th chord |
|
m7 or min7 or -7 |
Minor 7th chord, usually with a lowercase "m" |
|
Dim or o |
Diminished chord |
|
Aug or "+" |
Augmented chord |
|
Dim7 or o7 |
Diminished 7th |
|
m7b5 or ø or ø7 |
Half-diminished 7th chord |
|
sus4 |
Suspended 4th chord |
|
sus2 |
Suspended 2nd chord |
Then you might also notice other symbols, like sharps and flats. These aren't symbols that tell you the type of the chord, but they show the exact root note. In order to fully understand this, you'll need to learn music theory basics.
- ♯ or # – Sharp symbol
- ♭or b – Flat symbol
Extended Guitar Chords and Their Signs
Extended chords are chords that come with added notes that come beyond the 7th note. There are three types of these extended chords:
|
9 |
Comes with a major or minor 2nd interval (depends on the key) from a higher octave |
|
11 |
Comes with the perfect 4th interval from the higher octave |
|
13 |
Comes with a major or minor 6th interval (depends on the key) from the higher octave |
However, there are other variants as well:
|
♯9 |
Augmented 9th interval |
|
♭9 |
Diminished 9th interval |
|
♯11 |
Augmented 11th interval |
|
♭11 |
Diminished 11th interval |
|
♯13 |
Augmented 13th interval |
|
♭13 |
Diminished 13th interval |
Difference Between add9 and 9th Chord
As you may notice, there are also 9th and add9 chords. The main difference here is that a 9th chord includes the 7th chord with the 9th interval above it. The add9 chord, on the other hand, includes just the basic triad (1st, 3rd, and 5th intervals) with an added 9th over it.
Here's an F minor 9th chord:

And here's an F minor add9 chord:

Slash Chord
When reading chord charts, you may also notice the so-called "slash" chords. Also known as the "compound" chords, they are actually inversions of chords. Not to bother you too much with music theory, this means that the bottom (bass) note is not the same as the root note. The proper way to write the name of such a chord is to add a slash (/) and the bass note after the chord name.
The simplest example would be the C/G major in the open position:
How to Read Chord Diagrams?
There are two things to know when it comes to reading chord charts and diagrams:
- Reading individual chords
- Reading chord progressions and entire songs
As for the individual chords, we already explained the basic principles. Horizontal lines are the frets, the thickest top horizontal line is the nut ("zero fret"), vertical lines are the strings, and the dots (or circles) show where you should put the fingers on the fretboard.
They'll also include a chord name above them, and some will also feature finger numbers within the dots. Bear in mind that some chords are not played in the open position, so you'll also have the fret number written on the left side of the individual chord diagram.
Chord progressions and songs are usually in combination with lyrics. If it's an instrumental part, you'll just have chords listed in the right order. Some charts also include rhythmic notation, but we'll get to that.
What Is a Chord Progression?
In simple terms, a chord progression is a succession of chords. For instance, a particular song that you want to learn how to play has different chords in it played in a specific order.
Aside from using chord names, chord progressions can be written using Roman numerals. This approach is useful for those who want to play songs in different keys. However, you'll need to have some basic to intermediate music theory knowledge to understand it.
Here's an 8-bar example of a chord progression in the key of D minor:

What is a Lead sheet? How Does It Help?
Also known as a "fake sheet," a lead sheet is a simplified form of sheet music, mostly used for popular songs. Essentially, it features notation of the main melody and any important melodic parts, chord progressions written as chord names above the staff, and lyrics below the staff.
It's a rudimentary version of the full notation and accompaniment. It lacks the bass line, exact chord voicings, and a lot of the other elements. On the other hand, it has the key (or keys if it changes throughout the song) and time signatures.
However, a lead sheet can also include other parts if they're the crucial part of the song's identity. This includes specific riffs, basslines, or rhythm patterns.
In short, a lead sheet helps you perform the song but gives a lot of room for interpretation. In order to perform the song properly, you'd be required to know how the original version sounds since lead sheets don't have sufficient information in them. It's also worth noting that they're often used for jazz and blues standards.
Chord Signs in Lead Sheets
In order to be able to read lead sheets properly and use their full potential, you'll need to understand the signs used in them.
Bar Lines
Bar lines in lead sheets are like in regular musical notation or chord charts. They separate individual measures, as dictated by the time signature. In combination with the time signature and notation, you'll be able to understand the distribution of chords in a single measure.
Time Signature
The time signature determines the number of beats (or pulses) in a measure, as well as the note value assigned to a single beat. It consists of two numbers with one stacked above the other. The top one determines the number of beats, while the bottom one gives the note value to an individual beat.
It works the same way as in conventional musical notation and it's located at the beginning of the staff, right after the clef symbol. In case the time signature changes within one song, the stacked numbers appear again after a bar line.
Key Signature
A key signature is determined by a set of sharps or flats at the beginning of the staff after the clef, or by a lack of any. If the key signature changes, a clef with a new set of sharps or flats is added after a bar line.
Repeat Sign
The repeat sign notes that a certain section should be repeated. It implies two repeats unless stated differently. It's marked by two dots at the beginning and the end of the set of measures that are supposed to be repeated.
When the Repeated Section Has a Different Ending
However, it's fairly common for the repeated section to have a different ending. For this purpose, we can use numbered brackets above the staff. The first bracket indicates the measure that's played the first time around, while the second bracket with the number "2" in it indicates what's played the second time around.
The measure with the number "1" is omitted when you're playing the repeated section for the second time around. You go straight into the No. 2 measure. Here's how it looks in practice:

What are Dal segno: D.S al coda, D.S al fine?
In musical notation (and thus in lead sheets), "Dal segno" refers to specialized navigation markers. Essentially, it provides a more advanced way to repeat a certain section of the piece. "Dal segno" is abbreviated as "D.S." and translates to "from the sign." The symbol looks like this:

The sign will be located in the notation somewhere along the way, right above the staff. You pass this part and the next "signal" that you're looking for is "D.S. al Coda." When you end the measure marked with this writing, you immediately go back to the sign shown above.
But that's not all. After playing from the "segno," the next signal that you're looking for is "Al coda" or "To coda." Then, after reaching this signal, you jump to the next sign. It's called "coda" and it looks like this:

However, there's also the "D.S. al fine" signal. It tells you to go back to the "segno" (the first sign) and then play the piece until you reach a measure marked as "fine." The "fine" measure also marks the end of the piece.
The idea behind these signs and signals is to save some space and time. Instead of writing extra measures, you can just use these navigational markers. They might be tricky to figure out at first, but they'll make things much simpler when you get used to them.
Rhythm Slashes
Slash notation is used solely for rhythmic patterns. It implies no pitch, only note duration. It's accompanied by chords above the staff.
Slash Notation

Lead Sheet Example With Symbols

Wrapping it up....
If you've made it till here then you should be good at reading chord charts and lead sheets. But don't stop here, the fun is in progressing and playing any chord from any song like a pro.
Now, before you roll your eyes and think you already know this but it's going to take years then, let me stop you there and say "No it's not going to take years - that's what they've had you believe."
Even if you've picked up the guitar today you'll still be able to walk on to the stage and daze the audience - not kidding it just takes a mere couple of months.
All you need is the right information and guidance. So, how do you get all this? "Chords Bundle for Beginners," it comprises of three books and here is what this does:
- Help you memorize the entire fretboard on less than 24 hours - know all the notes like the back of your hand.
- Deconstruct all chord patterns and master 531 chords using CAGED system
- Get instant access to 1053 chords (including chords that are considered "exquisite" among us pro community) and well show-off your skills!
You can check out the bundle here and save 10% - give it shot!